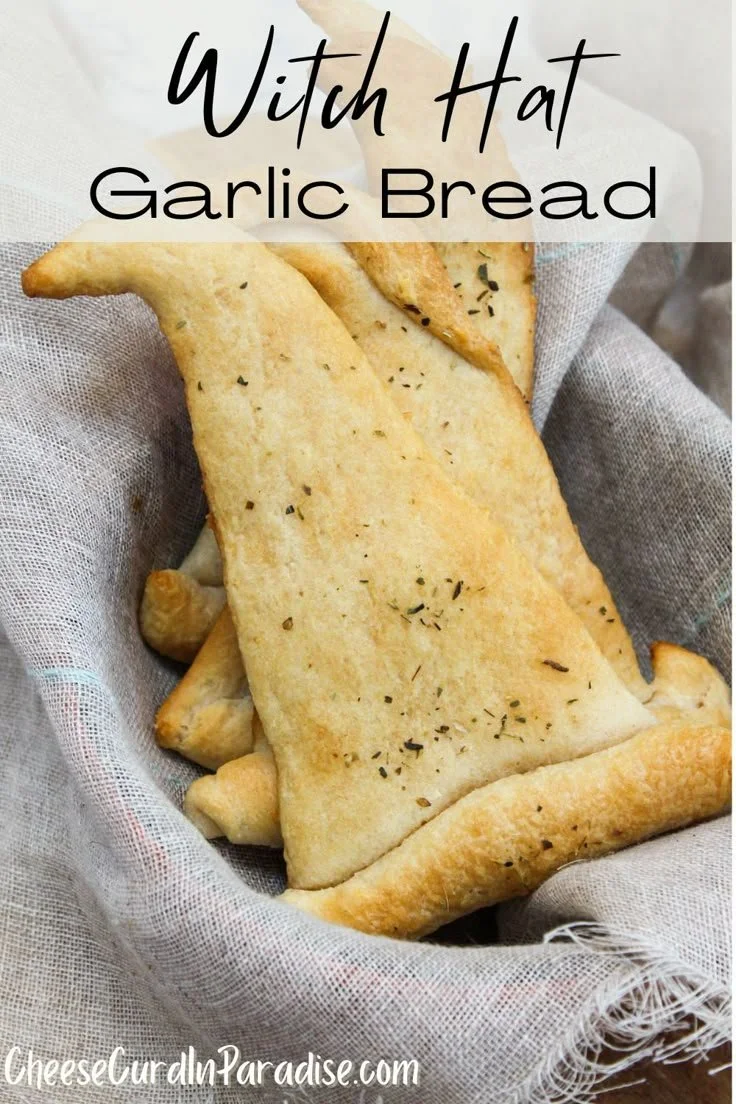
Witch Hat Garlic Bread is a fun and festive twist on a classic favorite, making it a perfect addition to your Halloween celebrations. This charming recipe combines savory flavors and a playful shape, delighting both kids and adults alike. Easy to prepare with just a few ingredients, it’s an ideal option for beginner cooks looking to make something special this season.
Why You’ll Love Witch Hat Garlic Bread
- Simple and Quick: With just seven ingredients and minimal prep time, you can whip up this delightful dish in no time.
- Fun Presentation: The unique shape resembling a witch’s hat adds a spooky touch that’s perfect for Halloween parties or gatherings.
- Customizable Flavor: The base recipe allows for plenty of variations to suit your taste, whether you prefer extra garlic or blended cheeses.
- Perfect for Sharing: This garlic bread works as both an appetizer and a side dish, making it great for social occasions.
- Kid-Friendly: Children will love helping to shape the dough, making it a fun cooking activity for the whole family.
Recipe Overview
- Prep Time: 10 minutes
- Cook Time: 15 minutes
- Total Time: 25 minutes
- Servings: 8 servings
- Difficulty Level: Easy
Ingredients You’ll Need for Witch Hat Garlic Bread
- Crescent Rolls: 1 can (these provide the pastry base).
- Cream Cheese: 4 oz, softened (adds creaminess and richness).
- Grated Parmesan Cheese: 1/4 cup (for a savory kick).
- Garlic: 2 cloves, minced (to enhance flavor).
- Fresh Parsley: 1/4 cup, chopped (for freshness and color).
- Salt: 1/2 tsp (to taste).
- Black Pepper: 1/4 tsp (to taste).

here
How to Make Witch Hat Garlic Bread
- Preheat the Oven: Set your oven to 375°F (190°C) so it’s ready for baking.
- Mix the Filling: In a bowl, combine cream cheese, Parmesan cheese, minced garlic, parsley, salt, and black pepper. Mix until well blended.
- Prepare the Crescent Rolls: Open the can of crescent rolls and carefully separate the dough into triangles.
- Add the Filling: Place a generous spoonful of the cheese mixture at the wide end of each triangle.
- Shape the Dough: Roll the dough around the filling, tapering the top to form the point of the “hat.” Make sure the filling is enclosed.
- Arrange on Baking Sheet: Place the rolled “hats” on a baking sheet lined with parchment paper, spaced apart.
- Bake: Bake for 12-15 minutes or until the crescent rolls are golden brown.
- Serve Warm: Enjoy your spooky garlic bread fresh from the oven as a deliciously fun side dish.
Tips for Success
- Room Temperature Ingredients: Ensure your cream cheese is at room temperature for easier mixing and smoother texture.
- Watch the Baking Time: Ovens can vary, so keep an eye on the bread to prevent over-browning.
- Don’t Overfill: Use just enough filling to prevent the dough from bursting while baking.
- Fresh Herbs: If you can, use fresh parsley for the best flavor; dried herbs can be used in a pinch but won’t taste as vibrant.
- Experiment with Flavors: Feel free to add other herbs or spices to the cheese mixture for extra flavor.
Easy Variations
- Cheese Swap: Replace Parmesan with mozzarella for a gooey, cheesy center.
- Add Heat: Incorporate red pepper flakes into the filling for a spicy kick.
- Veggie Add-ins: Mix in finely chopped spinach or roasted red peppers for an extra burst of color and nutrition.
- Dairy-Free Option: Use vegan cream cheese and nutritional yeast for a plant-based version.
- Festive Sprinkles: Add black sesame seeds on top before baking for added texture and a Halloween look.
What to Serve with Witch Hat Garlic Bread
- Soup: Pair with a creamy tomato basil soup for a comforting meal.
- Salad: Serve alongside a fresh green salad for a light and healthy dinner.
- Pasta Dishes: This garlic bread complements any Italian pasta dish, including spaghetti or lasagna.
- Charcuterie Board: Add it to a charcuterie board for a fun spread at parties.
- Halloween-Themed Dishes: Combine with other spooky snacks like pumpkin-shaped cheese balls for a themed spread.
Storage and Reheating
- Refrigerator Storage: Store leftover Witch Hat Garlic Bread in an airtight container in the refrigerator for up to 3 days.
- Freezer Storage: You can freeze the unbaked shapes, placing them on a baking sheet until firm, then transferring to a freezer bag. Bake directly from frozen, adding a few extra minutes to the baking time.
- Reheating: To reheat, place leftovers in the oven at 350°F (175°C) for 5-7 minutes until warmed through. This helps maintain the crispy texture.
- Meal Prep Tip: Prepare the filling ahead of time and refrigerate it. Assemble the garlic bread shortly before baking.
Common Mistakes to Avoid
- Rushing the Dough: Don’t forget to let your crescent rolls sit at room temperature before handling for easier separation.
- Incorrect Baking Time: Baking for too long can lead to overly dry bread; check for a golden brown color for doneness.
- Overmixing the Filling: Mix just until combined to keep the creaminess intact without becoming too runny.
- Skipping Parchment Paper: Always use parchment paper or a silicone mat to prevent sticking.
- Too Much Filling: Avoid overstuffing each crescent roll to prevent spills during baking.
Witch Hat Garlic Bread: Background & Cultural Inspiration
Witch Hat Garlic Bread draws inspiration from the playful themes surrounding Halloween, where creativity in food presentation is celebrated. Garlic bread itself has Italian origins, making its adaptation into themed shapes a delightful fusion of cultures. The tradition of using bread in festive settings has deep roots in many cuisines, often seen as a communal dish meant for sharing. This recipe cleverly incorporates elements of fun, flavor, and the spirit of celebration, appealing to both young and old.
Frequently Asked Questions
Can I use different types of cheese?
Yes! Feel free to experiment with different cheeses such as mozzarella or cheddar for varied flavors.
How can I store leftover Witch Hat Garlic Bread?
Store uneaten pieces in an airtight container in the fridge for up to 3 days. Reheat in the oven for best results.
Can I make this dish ahead of time?
You can prepare the filling in advance and assemble the bread just before baking for optimal freshness.
What can I serve with Witch Hat Garlic Bread?
This bread pairs well with soups, salads, or as part of a Halloween-themed spread.
Can I freeze Witch Hat Garlic Bread?
Yes, you can freeze the unbaked shapes for up to a month. Bake directly from frozen, adding a few extra minutes to the baking time.
Final Thoughts
Witch Hat Garlic Bread is a charming recipe that combines deliciously savory flavors with a playful presentation, making it an ideal addition to your Halloween festivities. Its simplicity and versatility ensure that even beginner cooks can achieve delightful results. Try making this dish for your next gathering and share the joy of cooking with family and friends. Enjoy the celebrations and the compliments that come with it!
PrintWitch Hat Garlic Bread
A fun and festive twist on classic garlic bread, perfect for Halloween celebrations.
- Prep Time: 10 minutes
- Cook Time: 15 minutes
- Total Time: 25 minutes
- Yield: 8 servings
- Category: Appetizer
- Method: Baking
- Cuisine: Italian
- Diet: Vegetarian
Ingredients
- Crescent Rolls: 1 can
- Cream Cheese: 4 oz, softened
- Grated Parmesan Cheese: 1/4 cup
- Garlic: 2 cloves, minced
- Fresh Parsley: 1/4 cup, chopped
- Salt: 1/2 tsp
- Black Pepper: 1/4 tsp
Instructions
- Preheat the Oven: Set your oven to 375°F (190°C).
- Mix the Filling: In a bowl, combine cream cheese, Parmesan cheese, minced garlic, parsley, salt, and black pepper. Mix until well blended.
- Prepare the Crescent Rolls: Open the can of crescent rolls and carefully separate the dough into triangles.
- Add the Filling: Place a generous spoonful of the cheese mixture at the wide end of each triangle.
- Shape the Dough: Roll the dough around the filling, tapering the top to form the point of the “hat.”
- Arrange on Baking Sheet: Place the rolled “hats” on a baking sheet lined with parchment paper, spaced apart.
- Bake: Bake for 12-15 minutes or until golden brown.
- Serve Warm: Enjoy your spooky garlic bread fresh from the oven.
Notes
Ensure cream cheese is at room temperature for easier mixing. Adjust baking time as necessary.