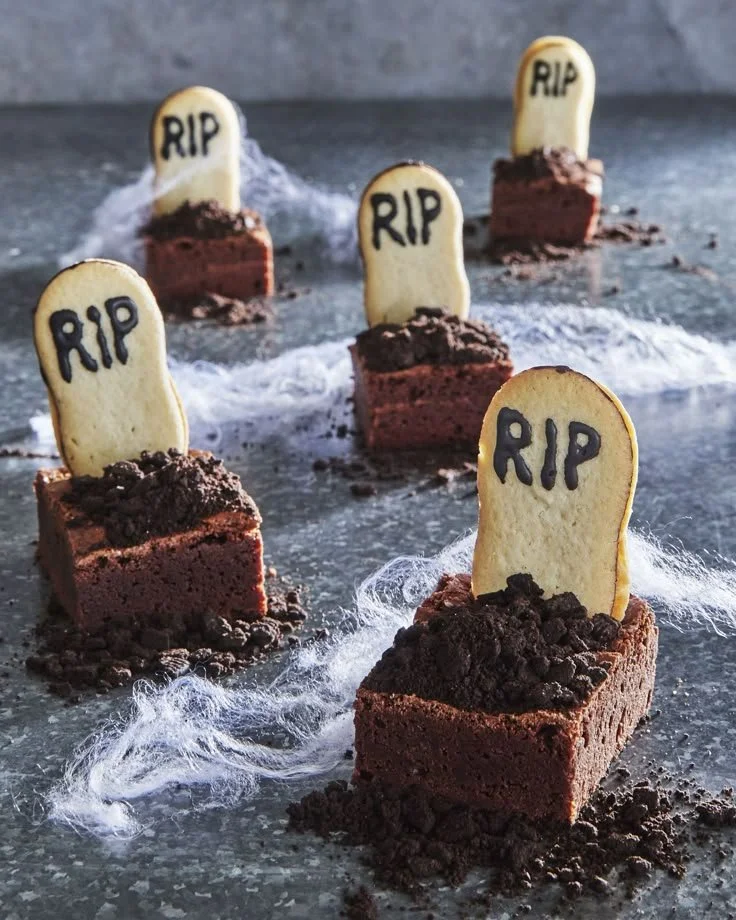
Cute Graveyard Brownies for Halloween are the perfect treat to impress your friends and family during the spooky season. These fun and festive brownies are not only deliciously fudgy but are also adorned with playful decorations that will capture everyone’s attention. Made with simple ingredients and easy steps, these brownies make for a delightful Halloween activity!
Why You’ll Love Cute Graveyard Brownies
- Easy to Make: This recipe requires minimal ingredients and straightforward steps, making it perfect for beginner bakers.
- Fun Decorations: Kids and adults alike will enjoy helping to create the spooky graveyard scene, making it a great family activity.
- Perfect for Any Occasion: While ideal for Halloween, these brownies can be customized for any festive gathering or party.
- Fudgy and Rich: The deep chocolate flavor and chewy texture make these brownies an absolute treat for chocolate lovers.
- Versatile Add-Ins: You can easily modify the toppings or add extra ingredients to make the brownies uniquely yours.
Recipe Overview
- Prep Time: 20 minutes
- Cook Time: 30 minutes
- Total Time: 50 minutes
- Servings: 12 brownies
- Difficulty Level: Easy
Ingredients You’ll Need for Cute Graveyard Brownies
- For the Brownies:
- 1 cup unsalted butter, melted
- 2 cups granulated sugar
- 4 large eggs
- 1 teaspoon vanilla extract
- 1 cup all-purpose flour
- 1 cup cocoa powder
- 1/2 teaspoon salt
- 1/2 teaspoon baking powder
- For the Decorations:
- Black chocolate frosting or icing
- Oreo cookies (for the grave markers)
- Candy tombstones or Halloween-themed candies
- Green-tinged coconut or crushed green candy for grass (optional)

here
How to Make Cute Graveyard Brownies
- Preheat the Oven: Preheat your oven to 350°F (175°C). Grease a 9×13-inch baking dish or line it with parchment paper for easy removal.
- Mix Wet Ingredients: In a large mixing bowl, whisk together the melted butter and sugar until combined. Add in the eggs one at a time, mixing well after each addition. Stir in the vanilla extract.
- Combine Dry Ingredients: In a separate bowl, whisk together the flour, cocoa powder, salt, and baking powder.
- Combine Mixtures: Gradually add the dry ingredient mixture to the wet ingredients. Mix until just combined; be careful not to over-mix.
- Bake the Brownies: Pour the batter into the prepared baking dish, spreading it evenly. Bake in the preheated oven for 25-30 minutes, or until a toothpick inserted in the center comes out with a few moist crumbs.
- Cool Brownies: Allow the brownies to cool in the baking dish on a wire rack for about 15 minutes before removing from the pan and cooling completely on the rack.
- Decorate: Once cooled, frost the top with black chocolate frosting. Use Oreo cookies as grave markers by placing them upright into the frosting. Add candy tombstones and sprinkle green coconut around for extra detail.
Tips for Success
- Don’t Overbake: Keep an eye on the brownies to ensure they remain fudgy. They should slightly underbake for the best texture.
- Room Temperature Eggs: Using room temperature eggs helps them incorporate better into the batter.
- Use Parchment Paper: Lining the baking dish with parchment paper makes it easy to lift the brownies out for cutting.
- Customize Decorations: Feel free to get creative with different candies or sprinkles to personalize your graveyard scene.
- Taste Before Decorating: If you plan to share, taste a brownie before frosting to ensure the amount of frosting complements the richness of the chocolate.
Easy Variations
- Gluten-Free: Substitute all-purpose flour with a 1:1 gluten-free baking flour.
- Nutty Brownies: Add chopped walnuts or pecans to the batter for added texture.
- Pumpkin Brownies: Swirl some pumpkin puree into the batter for a seasonal twist.
- Spooky Colors: Use colored frosting or icing instead of black for a brighter graveyard.
- Chocolate Chips: Fold in some chocolate chips for extra chocolatey goodness.
What to Serve with Cute Graveyard Brownies for Halloween
- Vanilla Ice Cream: The creamy texture of vanilla ice cream pairs perfectly with the rich brownies.
- Hot Chocolate: A warm mug of hot chocolate complements the chocolate flavor of the brownies.
- Fruit Salad: A refreshing fruit salad adds a light contrast to the dense brownies.
- Halloween Snack Mix: Combine popcorn and various Halloween candies for a fun party mix alongside the brownies.
Storage and Reheating
- Refrigerator Storage: Store leftover brownies in an airtight container in the fridge for up to a week.
- Freezer Storage: Freeze brownies in a single layer, wrapped individually in plastic wrap, for up to three months. Thaw in the fridge overnight before serving.
- Best Reheating Method: For warm brownies, reheat in the microwave for about 10-15 seconds. This helps maintain their fudgy texture.
Common Mistakes to Avoid
- Using Cold Ingredients: Cold ingredients can affect the texture; always use room temperature eggs and butter.
- Underestimating Cooling Time: Cutting the brownies too soon can result in a messy presentation; let them cool completely.
- Ignoring Oven Temperature: Every oven is different; using an oven thermometer can ensure you’re baking at the correct temperature.
- Overmixing the Batter: Overmixing can lead to tough brownies; mix just until combined.
Cute Graveyard Brownies: Background & Cultural Inspiration
Brownies have been a beloved dessert in the United States since the early 1900s. The popularity of Halloween-themed treats began in the 1930s, shaping how we celebrate autumn festivities with fun, decorated foods. The idea of turning classic desserts into playful versions for holidays encourages creativity and family bonding during celebrations.
Frequently Asked Questions
Can I use a different frosting?
Yes, you can use any type of frosting or icing you prefer. Cream cheese frosting or a simple ganache can also work well.
How do I make the brownies more chewy?
For chewier brownies, add an extra egg yolk to the batter.
Can I use dark chocolate cocoa powder?
Absolutely, dark chocolate cocoa powder will deepen the chocolate flavor and yield richer brownies.
Can I prepare the batter ahead of time?
You can mix the dry ingredients ahead and store them separately. Just combine them with the wet ingredients when you’re ready to bake.
What if I don’t have eggs?
You can substitute each egg with a quarter cup of unsweetened applesauce or a flaxseed meal mixed with water for a vegan option.
Final Thoughts
Cute Graveyard Brownies for Halloween are a delightful way to celebrate the spooky season. Their rich chocolatey taste paired with fun decorations ensures that they’re not just a treat but also a memorable activity to share with loved ones. Give this recipe a try, and create a festive dessert that’s bound to be a crowd-pleaser!
PrintCute Graveyard Brownies

Deliciously fudgy brownies perfect for Halloween, adorned with playful decorations that create a spooky scene.
- Prep Time: 20 minutes
- Cook Time: 30 minutes
- Total Time: 50 minutes
- Yield: 12 brownies
- Category: Dessert
- Method: Baking
- Cuisine: American
- Diet: Vegetarian
Ingredients
- 1 cup unsalted butter, melted
- 2 cups granulated sugar
- 4 large eggs
- 1 teaspoon vanilla extract
- 1 cup all-purpose flour
- 1 cup cocoa powder
- 1/2 teaspoon salt
- 1/2 teaspoon baking powder
- Black chocolate frosting or icing
- Oreo cookies (for the grave markers)
- Candy tombstones or Halloween-themed candies
- Green-tinged coconut or crushed green candy for grass (optional)
Instructions
- Preheat your oven to 350°F (175°C). Grease a 9×13-inch baking dish or line it with parchment paper for easy removal.
- Mix the melted butter and sugar in a large mixing bowl until combined. Add in the eggs one at a time, mixing well after each addition. Stir in the vanilla extract.
- Combine the flour, cocoa powder, salt, and baking powder in a separate bowl.
- Combine the dry ingredient mixture into the wet ingredients. Mix until just combined; be careful not to over-mix.
- Bake in the preheated oven for 25-30 minutes, or until a toothpick inserted in the center comes out with a few moist crumbs.
- Cool the brownies in the baking dish on a wire rack for about 15 minutes before removing from the pan and cooling completely on the rack.
- Decorate the cooled brownies by frosting the top with black chocolate frosting. Use Oreo cookies as grave markers by placing them upright into the frosting. Add candy tombstones and sprinkle green coconut around for extra detail.
Notes
Don’t overbake for the best fudgy texture. Customize decorations to enhance the spooky theme.